How to Print Screen Only One Monitor (Windows and Mac)
Table of contents
Windows has no built-in key that captures just one monitor: the Print Screen key grabs every display in one wide image. The fastest built-in workaround is the Snipping Tool. Press Win+Shift+S and drag a box across the monitor you want, and only that area is captured. Alt+PrtScn narrows the shot to the active window instead, and a free tool like ShareX adds what Windows lacks, a true one-keystroke capture of a single monitor. Macs handle it natively: Cmd+Shift+3 saves each connected display as its own separate file.
Below are all four Windows methods in order of convenience, the Mac shortcuts, and fixes for the quirks that multi-monitor screenshots run into, like mismatched monitor heights leaving black bars in cropped images.
Here is the whole answer at a glance:
| What you want | Press this | What you get |
|---|---|---|
| One monitor, built-in | Win+Shift+S, then drag across that monitor | Exactly the area you dragged, on the clipboard |
| Active window only | Alt+PrtScn | The focused window, on the clipboard |
| Active window, saved as a file | Win+Alt+PrtScn | The focused window, saved to Videos > Captures |
| Everything, saved as a file | Win+PrtScn | All monitors in one wide image, saved to Pictures > Screenshots |
| One monitor with one keystroke | A ShareX hotkey (free tool) | The monitor under your cursor, saved automatically |
| One monitor on a Mac | Cmd+Shift+3 | Each display saved as its own file |
Method 1: Snipping Tool (the built-in answer)
The Snipping Tool captures any rectangle you draw, and a monitor is just a big rectangle:
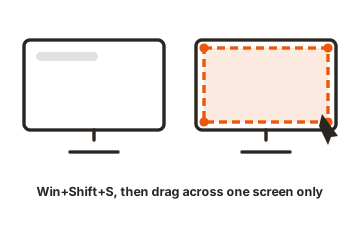
- Press Win+Shift+S. Every screen dims and a small toolbar appears at the top.
- Make sure Rectangular mode is selected on the toolbar (it is the default).
- Click the top-left corner of the monitor you want and drag to its bottom-right corner, then release.
- The capture lands on your clipboard instantly. Click the notification to open it in the Snipping Tool editor, where you can mark it up and save it as a file.
Two notes. The Snipping Tool’s own Full screen mode captures all monitors at once, so for a single screen the rectangular drag is the mode you want. And on Windows 11 you can make the Print Screen key itself open this capture bar (more on that in the quirks section). Microsoft documents every mode and shortcut in its Snipping Tool guide.
On Windows 10 the same shortcut opens Snip & Sketch, which works identically for this job. Two of the tool’s other modes are worth knowing while you are here. Window mode captures a single app cleanly, which covers you whenever one app fills the target monitor. And the delay timer (in the Snipping Tool app itself) lets you set a 3-, 5-, or 10-second countdown, long enough to open a menu or hover state you want inside the capture.
Method 2: Alt+PrtScn (the active-window trick)
Alt+PrtScn copies only the window currently in focus, ignoring everything else on every monitor. On its own that is a window capture, not a monitor capture, but one habit turns it into a near-perfect single-monitor shot: maximize the app on the monitor you want, click it so it has focus, and press Alt+PrtScn. You get that monitor’s entire working area in one clean image, minus the taskbar, with nothing from the other screens. Paste it anywhere with Ctrl+V.
A close cousin saves a file instead of using the clipboard. Win+Alt+PrtScn, part of the Game Bar, captures the active window straight to a PNG in your Videos > Captures folder, no pasting required. Despite the gaming branding, it works on ordinary apps too.
The limit of this trick is obvious but worth naming: it captures one window, so a monitor showing two apps side by side needs the Snipping Tool drag or a monitor-capture hotkey instead. For the very common case of one maximized app per screen, though, Alt+PrtScn remains the fastest keystroke in Windows.
Method 3: Capture everything, then crop
The old-fashioned route still works and is sometimes what you want. Press PrtScn to copy all monitors to the clipboard, or Win+PrtScn to save the combined image automatically to Pictures > Screenshots. Then open the image in Photos or Paint, crop to the monitor you need, and save.
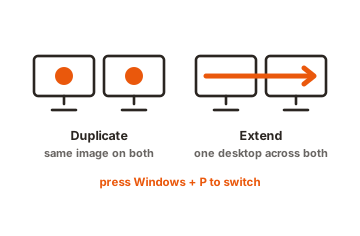
This is the slowest option for a one-off shot, but it earns its place in two situations: when you want a record of every monitor and single-screen crops of the same moment, and when the thing you are capturing is fleeting, since grabbing everything first means you can decide what mattered afterward. If you go this route often, press Win+V and enable clipboard history so a mistimed copy never wipes out the capture before you crop it.
Games and full-screen apps
Full-screen games are the one place these shortcuts get unreliable. A game running in exclusive full-screen mode can hand the Snipping Tool a black rectangle, because the tool never gets to see the frame. Two workarounds cover it. Win+Alt+PrtScn, the Game Bar capture, is built for exactly this and saves the game’s window to Videos > Captures even in full screen. Or switch the game’s display mode to borderless windowed, after which every normal method works, usually with no visible difference in play.
Game platforms add their own layer: Steam’s F12 captures the game to your Steam screenshot library, which is often the simplest answer when the goal is only the game itself rather than the whole monitor.
Method 4: ShareX for a true one-key monitor capture
If you capture one monitor many times a day, install ShareX, a free, open-source capture tool for Windows, from its official site. Among its capture methods are exactly the two Windows is missing: Monitor, which lists each connected display so you can pick one, and Active monitor, which instantly grabs whichever screen the cursor is on.
Open Hotkey settings in ShareX, add a hotkey, set its task to Capture > Active monitor, and assign a key combination (Print Screen itself is a good candidate). From then on, one press captures the monitor you are working on and saves the file automatically to ShareX’s screenshots folder, with optional auto-copy, annotation, or upload. Greenshot and PicPick are capable alternatives, but ShareX’s per-monitor hotkeys and automation make it the strongest fit for this exact job.
On a Mac, it’s built in
- Cmd+Shift+3 captures every connected display, and macOS saves each one as its own separate file on the desktop. With two monitors you get two images, already split, no cropping involved.
- Cmd+Shift+4 turns the cursor into a crosshair so you can drag across one monitor, exactly like the Windows Snipping Tool.
- Cmd+Shift+4, then the Space bar, switches to window mode: click any window to capture it alone with a neat drop shadow.
- Cmd+Shift+5 opens the full screenshot toolbar, where you can choose captures and recordings and change where the files are saved.
Two refinements round it out. Hold Control along with any of these shortcuts and the capture goes to the clipboard instead of a file, ready to paste. And the Cmd+Shift+5 toolbar’s Options menu sets the save location permanently, so per-display captures can land in a folder of your choosing rather than piling up on the desktop.
Quirks worth knowing about
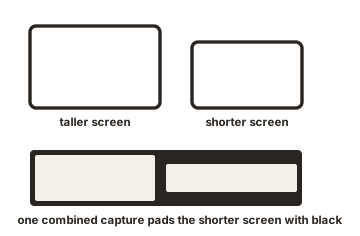
- Black bars in cropped captures. Monitors with different resolutions or scaling do not form a neat rectangle, so an all-monitor capture pads the shorter screen with black. Cropping around that is fiddly, which is one more reason the Snipping Tool drag or a ShareX monitor hotkey beats capture-and-crop on mixed setups.
- PrtScn opens the Snipping Tool instead of copying. Recent Windows versions can bind the Print Screen key to the Snipping Tool. Toggle this under Settings > Accessibility > Keyboard (“Use the Print screen key to open screen capture”) to get whichever behavior you prefer.
- No Print Screen key at all. Compact keyboards often drop it. Win+Shift+S needs no PrtScn key, and Microsoft PowerToys can remap any spare key to Print Screen if you miss it.
- Lost captures. Everything you copy lives one paste away, but the clipboard only holds the latest item by default. Press Win+V once to enable clipboard history and your last several screenshots stay retrievable.
- Washed-out captures on HDR screens. A screenshot of an HDR desktop is converted down to a standard image, and in many viewers it comes out pale or overbright. If a capture’s colors matter, the Game Bar capture usually produces a truer result, and switching HDR off for the moment of the screenshot settles it completely.
Which method should you use?
Match the method to the frequency. For a one-off, Win+Shift+S and a drag is unbeatable: nothing to install, and the editor is one click away if you need an arrow or a blur. For a screenshot headed straight into a chat or email, Alt+PrtScn on a maximized window is the fastest clipboard route. For an archive of a moment across every screen, Win+PrtScn saves the lot in one keystroke. And the moment single-monitor captures become a daily task, set up the ShareX hotkey once and stop thinking about it; that is the difference between a workaround and a workflow.
Conclusion
To print screen only one monitor on Windows, press Win+Shift+S and drag across that monitor, or maximize a window there and press Alt+PrtScn for a clipboard copy of just that screen’s content. For a genuine one-keystroke monitor capture, install the free ShareX and bind a hotkey to its active-monitor capture. Mac users need none of this: Cmd+Shift+3 already saves every display as its own file. Pick the method that fits how often you do it, and the two-screen screenshot problem disappears.
Setting up the second screen in the first place? See our guide to connecting a monitor, or browse all our monitor setup guides.
Frequently asked questions
Is there a keyboard shortcut to screenshot just one monitor in Windows?
Not built in. Print Screen always captures all displays, and Alt+PrtScn captures a window, not a screen. The closest native move is Win+Shift+S plus a drag. For a real single-key answer, ShareX (free) lets you bind a hotkey to capture the active monitor.
How do I screenshot only my second monitor?
Press Win+Shift+S and drag across the second monitor, or maximize the app there and press Alt+PrtScn. In ShareX, the Monitor capture lists each display by number so you can pick the second one directly, or a hotkey can grab whichever monitor holds your cursor.
Why does my screenshot show both screens?
Because you used PrtScn or Win+PrtScn, which capture the entire desktop across every display as one wide image. That is normal behavior, not a bug. Use a Snipping Tool drag, Alt+PrtScn, or a monitor-capture tool to narrow the shot.
Where do Windows screenshots get saved?
Win+PrtScn saves to Pictures > Screenshots, and Win+Alt+PrtScn saves to Videos > Captures. Plain PrtScn, Alt+PrtScn, and Win+Shift+S copy to the clipboard instead, though the Snipping Tool notification lets you save from its editor.
What does Ctrl+Alt+PrtScn do?
It behaves like plain Print Screen, copying all displays to the clipboard. The only modifier that narrows a capture natively is Alt+PrtScn, which grabs the active window. To capture one full monitor with a single shortcut, use a tool like ShareX.