Parts of a Monitor: What Each Part Does, Inside and Out
Table of contents
The parts of a monitor split into two groups. The outside parts are the ones you see and touch: the screen and bezel, the stand and base, the VESA mount holes, the ports, the power and menu buttons, the power input, and on some models speakers and a lock slot. The inside parts make the picture: the display panel (a stack of LCD layers, or an OLED), the backlight on LCD models, and three circuit boards that handle the signal, the power and the timing. This guide names each part, says where it sits, what it does and what goes wrong with it.
Parts of a monitor at a glance
Here is every major part in one place, from the front of the monitor to the inside of the case.
| Part | Where it is | What it does | Common problem |
|---|---|---|---|
| Screen | Front | Shows the image; the visible face of the panel | Cracks, scratches, dead pixels |
| Bezel | Frame around the screen | Holds the panel edges and hides wiring | Gaps that let light bleed |
| Stand and base | Under and behind | Holds the screen up; adjusts tilt, height, swivel | Wobble, sagging hinge |
| VESA mount holes | Back, center | Four screw holes for an arm or wall mount | Missing on some thin models |
| Ports panel | Back or underside | Takes HDMI, DisplayPort, USB-C and USB cables | Loose or worn port |
| Power and OSD controls | Bottom edge, side or back | Turns the monitor on and opens the menu | Stuck or dead buttons |
| Power input | Back | Takes an AC cord or a DC plug from a power brick | Failed brick or loose plug |
| Speakers | Inside, behind side or bottom vents | Play sound sent over HDMI, DisplayPort or USB-C | No sound, set to wrong output |
| Lock slot | Back, usually near a corner | Lets a cable lock tie the monitor to a desk | None |
| Display panel | Inside, behind the front | Makes the image from the signal | Lines, dead pixels, cracks |
| Backlight (LCD only) | Behind or along the edge of the panel | Supplies the light the LCD filters | Dark screen, dim patches |
| Main board (scaler) | Inside, behind the ports | Reads the input and fits it to the panel | No signal, menu freezes |
| Power board | Inside, near the power input | Turns wall power into low DC voltages | Will not turn on, clicking |
| T-con board | Inside, on or near the panel | Times the signal to each row and column | Lines, wrong colors, half-dark image |
| Ribbon cables | Between boards and panel | Carry video and power between parts | Lines or flicker when loose |
The outside parts of a monitor
These are the parts you can see without opening the case. Most of them decide how easy a monitor is to set up and live with, rather than how good the picture looks.
Screen and bezel
The screen is the front face of the panel, usually finished with a matte anti-glare coating or a glossy one. Matte coatings spread out reflections from lamps and windows. Glossy finishes keep the image a little crisper but show more reflections.
The bezel is the frame around the screen. It covers the panel’s edges, where the driver chips and wiring sit, and helps hold the panel in place. Thin-bezel monitors still have a black border inside the glass, so the visible frame is only part of it. The bezel is not counted in a monitor’s advertised size, which is measured diagonally across the viewable screen.
Stand and base
The stand holds the screen up, and the base keeps it steady on the desk. A basic stand only tilts. Better stands add height adjustment, swivel left and right, and pivot to portrait mode. The neck usually clips or screws into the back of the monitor, so you can take it off for transport or to fit an arm.
VESA mount holes
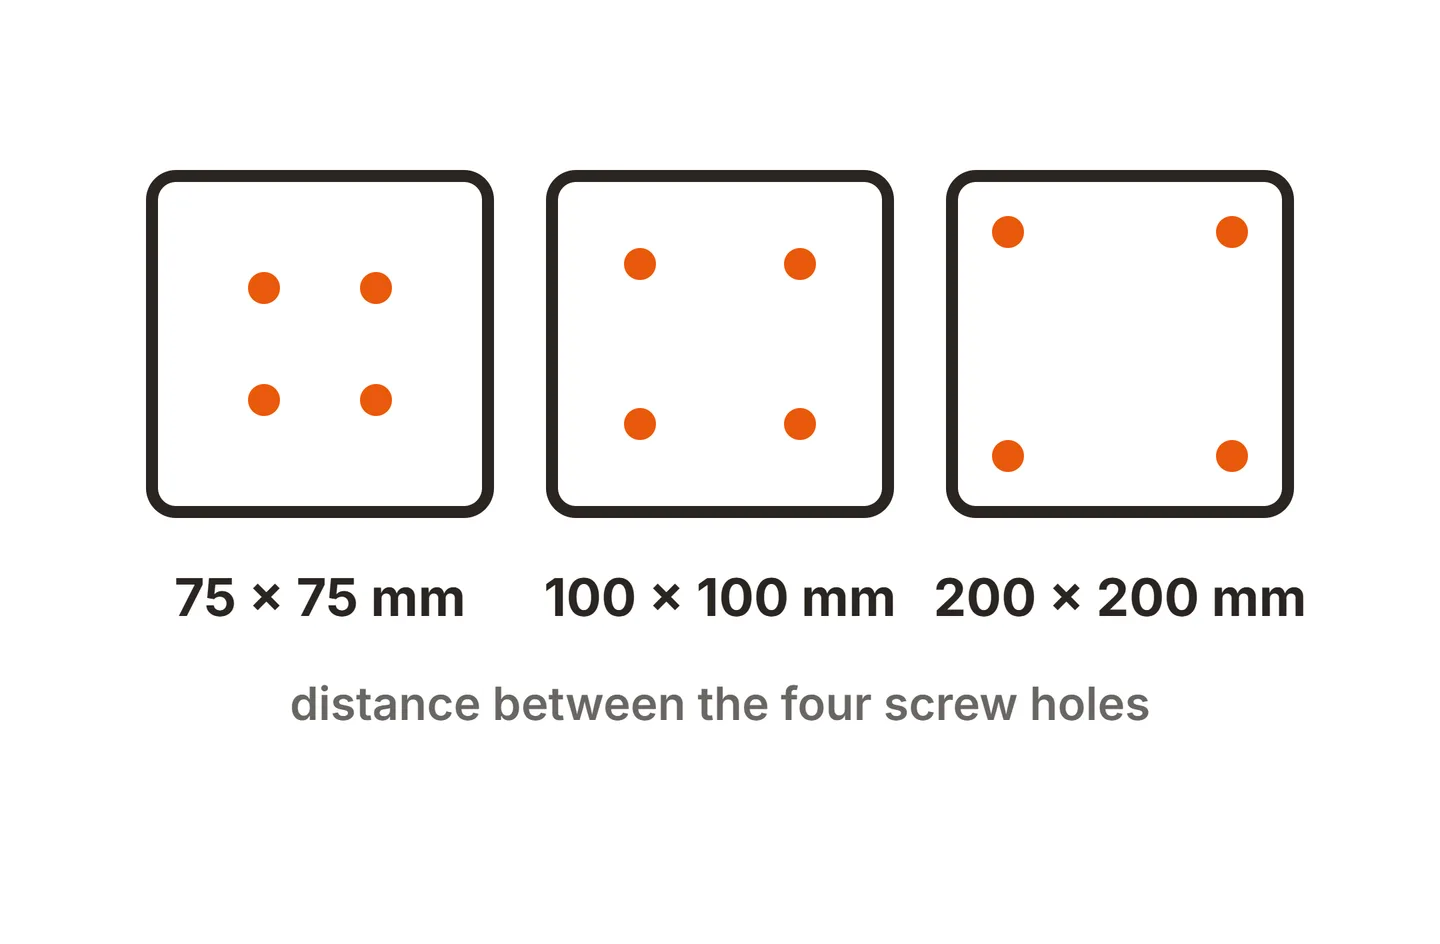
Most monitors have four threaded holes on the back in a square pattern defined by the VESA mounting standard. Monitors mostly use 75 x 75 mm or 100 x 100 mm spacing. These holes let you swap the stand for a monitor arm or wall mount. Some slim monitors hide the holes under a cover or skip them, so check before you buy an arm. Our VESA mount guide covers sizes, screws and what to do if your monitor has none.
Ports panel
The ports panel is a row of sockets on the back or underside. This is where the video cable goes in. Typical ports on a current monitor:
- HDMI and DisplayPort for video from a PC, console or laptop.
- USB-C on many newer models, which can carry video, data and sometimes power to a laptop over one cable.
- USB-A ports on monitors with a built-in USB hub. These need an upstream USB cable to the PC to work.
- Headphone or audio out jack, which passes on the sound carried by the video cable.
- VGA or DVI on older or budget models.
If you are not sure which cable to use, our guide on how to connect a monitor matches each port to the right cable.

Power button and OSD controls
The power button turns the monitor on and off. The other controls open the on-screen display (OSD), the monitor’s own settings menu for brightness, input, color and more. Older and budget monitors use a row of small buttons on the bottom edge or side. Many newer monitors use a single small joystick under the center or right of the bottom edge, which you push in to open the menu and tilt to move around it. A small LED nearby shows power status, often white or blue for on and amber for standby.

Power input
A monitor gets power in one of two ways. Most monitors have the power supply built in and take a standard AC power cord straight from the wall. Many slim and budget models use an external power brick instead, which plugs into a small round DC socket on the back. Portable monitors often take power over USB-C. If a monitor with a brick will not turn on, the brick is the first thing to test.
Speakers
Some monitors have small built-in speakers behind vents on the back or bottom edge. They play sound sent over HDMI, DisplayPort or USB-C, and they are fine for system sounds and video calls. Many monitors, especially gaming and professional models, have none. Our guide to whether all monitors have speakers shows how to check a spec sheet.
Cable management and the lock slot
Many stands have a clip, loop or hole in the neck to route cables neatly down the back. Some monitors also add a rear cover that snaps over the ports panel.
The lock slot is a small rectangular hole on the back, usually near a corner. A cable lock clips into it and loops around a desk leg so the monitor cannot walk away from an office or classroom. The most common type is the Kensington slot, and Dell’s guide to physically securing a computer or monitor places it on the rear of its monitors, normally on the right side as you face the screen.
Some monitors add extras: a webcam, an ambient light sensor that adjusts brightness, or a headphone hook. These vary by model.
The inside parts of a monitor
Inside the plastic or metal case, a monitor has two main sections: the display panel at the front, and a metal tray of circuit boards behind it. The panel makes the image. The boards turn your computer’s signal into something the panel can show, and supply the power.
The LCD panel and its layers
Most monitors use an LCD (liquid crystal display) panel. An LCD does not make light. It works like a grid of millions of tiny shutters in front of a light source. From back to front, the layers are:
- Rear polarizer. A filter that only lets light vibrating in one direction pass through.
- TFT glass. A sheet of glass covered in thin-film transistors (TFT), one tiny switch for every subpixel. Each transistor holds a voltage that tells its subpixel how much light to pass.
- Liquid crystal layer. A thin layer of liquid crystals that twist or turn when voltage is applied. Their angle changes how much light gets through the next filter. IPS, VA and TN panels differ mainly in how these crystals are lined up and move.
- Color filter. A sheet of red, green and blue filters, one over each subpixel. Three subpixels together make one pixel.
- Front polarizer. A second filter, turned at an angle to the first. Light only reaches you if the liquid crystals have rotated it to match.

When a pixel should be black, the crystals leave the light unrotated and the front polarizer blocks it. When it should be white, the crystals rotate the light fully so it passes. Every shade in between is a partial twist. The block is never perfect, which is why LCD blacks look slightly gray in a dark room and why IPS glow appears at steep viewing angles.

Backlight and diffuser
The backlight is the light source behind an LCD. Modern monitors use white LEDs, arranged in one of two ways:
- Edge-lit. A strip of LEDs runs along one or more edges, and a clear light guide plate spreads their light across the back of the panel. This keeps monitors thin and cheap, and it is the most common design.
- Direct-lit or full-array. LEDs sit in a grid right behind the panel. Mini LED monitors use hundreds or thousands of very small LEDs in dimmable zones for deeper blacks.
Between the LEDs and the panel sit a diffuser sheet and a few optical films. The diffuser evens out the light so you do not see bright spots from each LED, and the films push more of the light forward toward you.
When the backlight fails, the screen goes dark, but the image is often still faintly there. Shine a flashlight at the screen at an angle: if you can make out the desktop, the panel and boards work and only the light is gone. Our guide to an LCD monitor without a backlight explains this test and the monitors built to run on room light instead.
OLED panels: a shorter stack
OLED monitors skip the backlight, the liquid crystals and the diffuser. Each subpixel is a layer of organic material that glows when current flows through it, switched by its own transistors on a backplane behind it. A black pixel is simply off, which is why OLED blacks are truly black.
There are two main OLED designs in monitors. WOLED, made by LG Display, uses white-emitting OLEDs under color filters. QD-OLED, made by Samsung Display, uses blue OLEDs and a quantum dot layer that converts some of that light into red and green. Both add a thin seal to keep out air and moisture, and a polarizer or similar film on the front to cut reflections.
Main board and scaler
The main board, also called the scaler board or interface board, is the monitor’s brain. It sits behind the ports panel, and the ports are often soldered straight onto it. Its main chip, the scaler, does several jobs:
- Reads the signal from HDMI, DisplayPort or USB-C and works out its resolution and refresh rate.
- Scales a lower resolution up to fill the panel, for example 1080p on a 1440p screen.
- Draws the on-screen menu and applies your brightness, contrast and color settings.
- Handles features like adaptive sync and overdrive on many models, and sends audio to the speakers or headphone jack.
A failing main board can cause no signal on every input, a menu that freezes, or a monitor stuck on its logo.
Power board
The power board converts wall power (AC) into the low DC voltages the other boards and the backlight need. On many LED monitors it also contains the LED driver that powers the backlight. Monitors with an external brick have a smaller board or none, because the brick does most of the conversion.
The power board is the most common failure in an aging LCD monitor. Its capacitors wear out with heat and time, and a monitor that will not turn on, clicks, or blinks its power light points here first. The same capacitors can hold a charge after you unplug the monitor, so do not touch the board if you open the case.
Inverter on old CCFL monitors
LCD monitors from the 2000s used CCFL (cold cathode fluorescent lamp) tubes as their backlight instead of LEDs. Those tubes need high-voltage AC to light, which came from a separate inverter board, or an inverter section on the power board. A failing inverter makes the screen go dark a few seconds after it turns on, or flicker as the tubes struggle to start. LED monitors have no inverter. The inverter runs at high voltage, so leave it alone when a monitor is plugged in.
T-con board and ribbon cables
The T-con (timing controller) board takes the image from the main board and turns it into precise timing signals for the panel. It tells the driver chips along the panel’s edges which row and column to switch, and when. On many monitors the T-con is a small board fixed to the back of the panel. On others, its job is built into the main board’s chip, so there is no separate T-con at all.
Ribbon cables join the parts. A wide flat cable carries video from the main board to the T-con or panel, and thinner cables carry power from the power board. Along the panel edge, very thin flexible strips bond the driver chips directly to the glass.
These cables and the T-con cause many line faults. A loose ribbon cable or failing T-con board can cause vertical lines, wrong colors, a doubled image or half the screen going dark. Lines that also cross the monitor’s own menu point to this part of the monitor, as our guide to lines on a monitor explains. The flex strips bonded to the glass cannot be fixed at home, so damage there usually means a new panel.
How the parts work together
Following the signal through the monitor shows how each part depends on the next.
Power comes in
The power board, or an external brick, turns wall power into DC for the boards and the backlight.The signal arrives
Your PC sends video over HDMI, DisplayPort or USB-C into the ports panel on the main board.The scaler prepares the image
The scaler reads the signal, fits it to the panel’s native resolution, and adds the menu and your picture settings.The T-con times it
The T-con turns each frame into row and column timing and sends it over ribbon cables to the panel’s driver chips.The panel shows it
Each subpixel’s transistor sets its liquid crystals, and the backlight shines through to form the picture. On an OLED, the subpixels light up on their own.
This chain is also the fastest way to diagnose a fault. No power light points to the power board or brick. A power light with no signal on any input points to the main board or cable. Lines or odd colors that show even in the menu point to the T-con, ribbon cables or panel. A dark screen with a faint image points to the backlight.
Which parts can be repaired
Most outside parts are cheap to replace or work around. A wobbly stand can be swapped for an arm, a dead power brick can be replaced with a matching one, and a loose port can sometimes be resoldered by a repair shop.
Inside, the boards are the realistic repairs. Power boards, main boards and T-con boards are separate parts that a repair shop, or a confident hobbyist, can swap. The panel is different. It is usually the costliest part, and a cracked or line-damaged panel almost always means a new monitor. Before you open anything, check the warranty, because opening the case usually voids it. Our ViewSonic monitor repair guide walks through how to decide between repair and replacement, and the same logic applies to most brands.
Conclusion
The parts of a monitor are easier to follow once you split them in two. Outside, the screen, bezel, stand, VESA holes, ports, buttons and power input decide how the monitor fits your desk and connects to your PC. Inside, the panel makes the picture, the backlight lights it on LCD models, and the main board, power board and T-con board feed it signal, power and timing. When something fails, match the symptom to the part first. For more on how monitors work, browse our specs guides or the full SubInsider monitor knowledge base.
Frequently asked questions
What are the main parts of a computer monitor?
On the outside, the screen, bezel, stand, ports, buttons and power input. On the inside, the display panel, the backlight on LCD models, and three boards: the main board with its scaler chip, the power board, and the T-con board that drives the panel. Ribbon cables join the boards to each other and to the panel.
What is the most important part of a monitor?
The panel. It decides resolution, panel type, contrast, color and refresh rate, and it is usually the most expensive part inside. The boards only feed it. That is also why a cracked panel usually means buying a new monitor, while a failed power board or main board can often be swapped for a modest cost.
Which monitor part fails most often?
The power board, on most LCD monitors. Its capacitors and power parts run warm and age over the years, which shows up as a monitor that will not turn on, clicks, or blinks its power light. Backlight LEDs are the next common failure, giving a dark screen with a faint image visible under a flashlight.
Is it safe to open a monitor?
Only unplugged, and with care. Capacitors on the power board can hold a charge after the cord is out, and CCFL inverters in older monitors produce high voltage. Opening the case usually voids the warranty too. For a monitor under warranty, contact the maker instead of taking it apart yourself.
Do OLED monitors have the same parts as LCD monitors?
Mostly. They share the case, stand, ports, buttons, main board, power board and timing electronics. The difference is the panel. An OLED has no backlight, no liquid crystal layer and no diffuser, because each pixel makes its own light. That makes the panel thinner and lets black pixels switch fully off.